Monday, December 21, 2015

ODI 11g Standard Sequence not Incrementing [Solved]


Issue: ODI 11g Interface with ODI sequence to generate surrogate key does not increment correctly. As seen in the screenshot below.


ODI Standard Sequence
The issue is that when you try to use the Standard Sequence it only populates one number in the column as shown below,

ODI Sequence increment issue - Illustrated.

Cause: The cause of the issue was that the agent was not processing target row by row.

Resolution:
The resolution is to follow a set of guidelines as follows,

  • Select an IKM which supports row by row processing using the ODI agent. We used the IKM SQL to SQL Control Append.
Change to an IKM that supports row processing by Agent.

  • Set Flow Control attribute to False in the IKM.
  • Make sure the column populated with Sequence is NOT checked for NOT NULL condition. 
This worked well for us. Try out and let us know. 
Note: The best and optimal way is to use a native database sequence. Even ODI documentation recommends the same. 

Monday, December 14, 2015

[BIP 11g] Restarting/Stopping BI Publisher 11g Services

Here is how to restart BI Publisher 11g Services from Console. 

Go to console, if you are inside the server just open localhost:7001/console or just open hostname:7001/console. Once inside the console from the domain structure panel on the left side select 'Deployments' as seen below.

Go to bifoundation_domain > Deployments
 Next select BI Publisher from the list of services listed 


Next go the tab on the top with 'Start' and 'Stop' buttons and Click on Stop > Force Stop Now

Confirm the action


Check the BI Publisher URL to confirm that  BI Publisher is down. 


Once confirmed, Select 'bipublisher' and select Start > Servicing all requests .


Now check the BI Publisher URL again,


Friday, December 11, 2015

[Solved] Impala ODBC SASL Authentication Error

Attempting connection
Failed to establish connection
SQLSTATE: HY000[Cloudera][ThriftExtension] (3) Error occurred while contacting server: ETIMEDOUT. The connection has been configured to use a SASL mechanism for authentication. Please check to see whether the server has been configured to use SASL for authentication

We came across this ODBC connectivity error while trying to connect to an Impala Data Source.

Cause: This cause of this error is that SASL Authentication has not been configured in the Impala Server. 

Resolution: This can be resolved easily by clicking Ok on the error and at the connection Information window uncheck the 'Use Simple Authentication and Security Layer(SASL)' option. 


Now Retest the connection and it will be working fine, provided you have given the correct credentials and connection details to Impala Server.


Import Cloudera Impala Tables to OBIEE Repository [Solved]

Recently we had an opportunity to work on a demo where the OBIEE data source was Cloudera Impala. So had to create a new ODBC source to import Impala tables to OBIEE repository. So here are the steps.

First you need to install the ODBC Driver for windows from Cloudera's Page.  Now install the Driver 
Installing is basically a very easy task. Advisable to gracefully stop BI Services before Installing as the Installer might ask you to stop Oracle Application Server.

Check for Sample DSN Conneciton
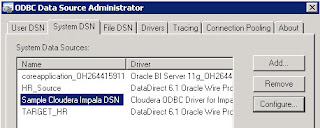
 Once you are done with ODBC driver installation go to run > ODBC and check if you have an entry named 'Sample Cloudera Impala DSN' to confirm that the driver Installation has successfully completed. 

Now click to add a new System DSN and select Cloudera Impala Driver as seen in the image below,
Select Cloudera Impala Driver from the list of drivers

Next provide connection details to your Cloudera Impala Server as seen below.


Default port for Cloudera Impala is 21050. Once you are done giving the details for the connection click on test to test connectivity as seen below,


 Now go to the OBIEE repository and Import metadata as shown below, Select the recently created Impala ODBC data source and proceed.


Select the Impala Tables to imported and Click Finish. Check the Physical Layer of the repository to see if the Impala Table has been successfully imported. You can use view data to feature to confirm the connection correctly.  

Table in Physical Layer of OBIEE Repository

 Tags: Big Data Cloudera Impala Server ODBC connectivity with OBIEE and BI Tools.

Tuesday, November 17, 2015

[Oracle11g] Database Table Locked Out - ORA00054 - [SOLVED]

Issue: Unable to drop a Table in Oracle 11g. Error ORA-00054: resource busy and acquire with NOWAIT specified or timeout expired.


Cause: The table object is locked out in the Oracle 11g Database.

Resolution: Killing the request serial# is the resolution to this issue and unlocking the Oracle Database table.

Find the locked object from the Oracle Database using the following query ,
select * from DBA_OBJECTS where OBJECT_NAME='TABLE_NAME'


Get the Object ID from this table

select * from V$LOCKED OBJECT where OBJECT_ID='OBJECT_ID_HERE';

From the above query get the SESSION_ID and run the following query to find the serial # for this session,


Now run the following query to kill the Session, the syntax is as below,

ALTER SYSTEM KILL SESSION 'SID,SERIAL#';


Easy Solution:

Alternatively run the following query to find the SID and SERIAL # for the particular database object as seen in screenshot below,

SELECT OBJ.OBJECT_ID,OBJ.OBJECT_NAME, VSES.SID, VSES.SERIAL#
FROM V$LOCKED_OBJECT VLOCK,
V$SESSION VSES,
DBA_OBJECTS OBJ
WHERE
VLOCK.SESSION_ID = VSES.SID
AND VLOCK.OBJECT_ID = OBJ.OBJECT_ID
AND OBJ.OBJECT_NAME ='Your_Object/Table_Name_Here'

Now use the below query to kill session,

ALTER SYSTEM KILL SESSION 'SID,SERIAL#';

Saturday, October 31, 2015

Oracle 11g R2 32/64bit Client Installation Steps

Here is how to proceed installing an Administrative database client for an Oracle 11g Database. Go the client setup folder and run the setup.exe file as Administrator.

Select the type of Installation of Client, Choose the Administrator option as seen in screenshot below.

Give necessary details to the Software updates and Product language step and proceed to Installation location step. Proceed with default as seen below or give a custom location for the same.
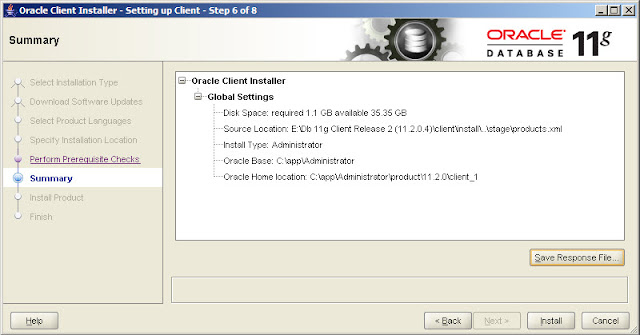
The installation will give a summary of the installation process before it starts. Save a response file for later reference of the installation. 

Wait for Installation to finish. 


Now to check the installation, go to Run and type sqlplus 

Check the header of the command prompt window to see the location of the sqlplus if this is from the client_1 folder then installation is successful. 


Oracle 11g R2 Server Database Installation Steps

Follow the below steps to Install and configure an Oracle 11g R2 Enterprise Edition on Windows Server 2008. Run the setup.exe file inside the setup folder as administrator. 

At the third step select 'Create and Configure a database' as shown in the below screenshot,

The next step is to select the system class for installation, choose server class since we are creating a server database. Refer screenshot below,

Since we are not going for a clustered installation select 'Single instance database installation'. 

Select the type of Installation as Typical Install. Choose Advanced install if you want to particularly configure database to detail. 

At the next step provide details such as directory location, database name, administrative password for SYS user etc and proceed. Refer screenshot below. 

The installation will check if the environment meets minimum requirements for installation of R2 Server. 

Before Installation step is started, a summary of the Installation will be displayed. It is recommended to save this Response file for future reference. 

Installation will proceed and finish.

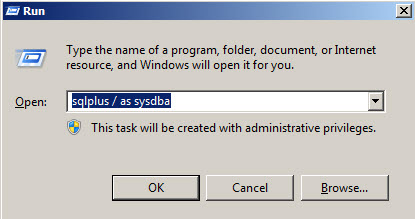
Once the Installation is complete, go to Windows > Run and type 'sqlplus / as sysdba' and click ok.

A new sqlplus command prompt will be opened and give a sample query to ensure that the database has been connected.

If at any step the Installation fails check the Oracle 11g Database logs to debug.

Friday, October 23, 2015

OBIEE: What is a Driving Table and when is it preferred ?

A driving table is a feature available in OBIEE using which one can improve performance of cross database joins. However this feature is very limited and can be counter productive. 

Here is how Oracle defines a Driving Table,
Driving tables are for use in optimizing the manner in which the Oracle BI Server processes cross-database joins when one table is very small and the other table is very large. Specifying driving tables leads to query optimization only when the number of rows being selected from the driving table is much smaller than the number of rows in the table to which it is being joined. 

When you specify a driving table, the Oracle BI Server will use it if the query plan determines that its use will optimize query processing. The small table (the driving table) is scanned, and parameterized queries are issued to the large table to select matching rows

This feature is available in the BMM(Business Model and Mapping Layer) of repository where you define a logical join between two tables, Here you will be able to see an option called Driving Table where you can select one of the two tables in the join. Make sure you are selecting the table with the less number of rows, usually preferred when data in one of the tables is very less ( <1000) and the other table is very large. 

Driving Table feature in Logical Join of OBIEE RPD.

Monday, October 19, 2015

What are Alias Tables and It's significance in OBIEE Physical Layer

An Alias Table or Alias in OBIEE is a physical table which references to a different physical OLAP/OLTP table as it's source.

Alias tables are often used for Repository development over Physical tables as they have the following properties,

  1. Enables reuse of a physical table.
  2. Avoids circular joins that can form when importing OLTP source tables.
  3. Create self joins between tables, for eg: Manager is also an Employee.
  4. Enables to easily identify source tables and adhere to data warehousing naming standards.
  5. Makes physical query generated easier to understand.
  6. Can override source table's caching properties like Cacheable, Cache never expires and cache persistence time. 
Alias Tables in OBIEE 11g - Example.


Find rows with Arabic/Non English Text in a Database Column

Scenario: Find and delete contact records with Arabic names from a database table.

Solution: In order to find the records we can use the query below, which will find you all records that contain non english alphabets and numbers. 

SELECT EMPLOYEE_ID, FIRST_NAME  FROM HR.EMPLOYEES WHERE NOT REGEXP_LIKE (FIRST_NAME,'[a-z,A-Z,0-9]');

To test the same, We updated one record from the EMPLOYEES table in HR Schema to an arabic text as seen below,

UPDATE HR.EMPLOYEES SET FIRST_NAME='اغراوال' WHERE EMPLOYEE_ID=183;


Arabic text in Employees table First Name column
Now run the first query to get this particular record alone with arabic text. 


Query output